Monday, September 28, 2009

Snow Leopard Features & Quirks: Finder


The Finder in OS X Snow Leopard 10.6 is not exactly the same Finder application that was in Leopard 10.5. Rewriting an application has obvious advantages, but can also introduce new issues. I will try to highlight both below within a features list.

  • Performance: Rewritten in Cocoa for Snow Leopard, so Finder is more responsive from top to bottom. Add 64-bit support and Grand Central Dispatch (which makes Finder multi-core-capable) to the list. Navigating around mounted volumes is also faster.
  • Spotlight: Customizable Spotlight search locations. Using View/Show View Options (Action/Show View Options, or cmd-J), adjust view options and sortable search results. According to some users, these last 2 features were Leopard 10.5 bugs and available options in OS X Tiger. iChat buddies can also be searched in Spotlight.
Users can also search iPhoto Faces and Places in Spotlight. Spotlight should index Faces and Places in iPhoto '09, but I had to force OS X to reindex first. After reindexing, Spotlight now appears to be much slower than before. I moved contacts to the top of the Spotlight "seach results" in preferences, but it appears to be one of the last categories populated during a search. Strange.

  • Icons: Enhanced live icon previews that let you thumb through a multipage document or watch a QuickTime movie. This is all done using the icons themselves, but I can't seem to get it to work on Word docs (.doc or .docx), although it does work on Pages docs. Finder also supports larger icon sizes up to 512x512.
  • Quick Look: Option-spacebar opens QL in full-screen mode. Selecting multiple items and then doing QL will include a button at the bottom of the QL window to switch between the selected items.
  • Column View: Select a folder in column view and press cmd-a it will select all the folders and files in that folder's containing folder, rather than all the items inside the folder itself.
  • Trash: Restore deleted items to original folders. Right click (or option click) on any item in the trash. When the contextual menu pops up, you should see an option that says "put back." Alternatively, you can also find that option in the action menu when you have your trash open. I did find that the "put back" feature is not consistent. Doing a "move to trash" from Finder will give me a "put back" option in the Trash, but doing a "move to trash" from Preview will not produce a "put back" option in the Trash.
  • Pinch & open multitouch gesture when in a finder window in icon view changes the size of the icons (works on desktop, too.). The same gesture in cover-flow view changes the size of the cover-flow window.
  • More reliable disk eject. The Finder will tell you which application is keeping a disk from being ejectable. Half bug fix, half user enhancement. In OS X 10.5, the message just stated the device was busy.
  • Flagged viruses. Snow Leopard has basic malware protection for Safari downloads. If you download an executable that contains a virus, the OS will warn you, and recommend you abort. Files that are infected will be marked as such in the Finder
  • Removable sidebar headers. If you prefer a minimal sidebar, you can remove all items under a sidebar header (Devices, Shared, Places, Search For). The sidebar header will then disappear. This is another "feature" that actually might be classified a bug fix.
  • Stacks. Stacks has had some improvements in Snow Leopard, but, unfortunately is still just a glorified document/application launcher, missing many of the Finder features noted above. I will cover Stacks in a separate article.

References
http://support.apple.com/kb/HT3737
http://www.apple.com/macosx/refinements/
http://www.apple.com/macosx/what-is-macosx/dock-and-finder.html
http://www.apple.com/macosx/refinements/enhancements-refinements.html
http://www.tuaw.com/2009/08/31/a-pawful-of-quick-snow-leopard-tips/2
http://www.geeksrus.com/category/apple/macintosh/snow-leopard/
http://www.h2hreviews.com/blog/Snow-Leopard-fot-Photographers.html
http://www.mis-asia.com/news/articles/11-major-new-snow-leopard-features
http://www.gizmodo.com.au/2009/09/15-snow-leopard-tricks-you-have-to-try/
http://www.macworld.com/article/141038/2009/06/106features.html
http://www.maclife.com/article/feature/100_snow_leopard_tips_tricks_and_features
http://www.crunchgear.com/2009/06/08/getting-to-know-grand-central-dispatch-opencl-and-your-64-bit-os/

http://thesmallwave.com/2009/08/31/discoveries-in-mac-os-x-snow-leopard-the-finder/

iPhone Cut & Paste Bug

I attended the Houston TechFest this weekend, and thought I would try something different with resume distribution. Since I am looking for a job, I wanted submit my resume to some of the vendors at the conference, but I didn't want to use a paper format to do so. The Univ. of Houston offers free wifi, so I collected business cards from a few contacts, and during the beginning of sessions I attended, used an iPod Touch to send my resume to the companies.

For the first email, I went into DocsToGo and sent my resume as an attachment. I then went into the Mail app. The entire email body (including the attachment) was copied, a new email message was created, and the original email body was pasted into the new email. The email was then sent. I continued pasting from the third email on.

I was amazed to see that the copy buffer was intact after turning-off the Touch's display and turning it back on some time later. I continued pasting the email body and attachment into new emails.

Later, I discovered (from the third email on) that attachments were not actually included in the emails. In the screenshot to the right, you can see attachments in the bottom 2 emails, but not in the top two.

The funny thing is, the mail app shows the attachment in the email detail. Touching any of the four emails in the list will show the exact, same detail. Touching the attachment on all four emails shows a quick-view of my resume.

Very odd behavior.

Friday, March 27, 2009

Tweaking PDF compression in Leopard

If you are like me and sometimes scan printed copies, article pages and such into PDFs, then you will notice that a multipage PDF will eventually become rather large as more pages are added. This is because the entire PDF consists of images.

I recently had a 12-page PDF that saved as a 15.4MB file, making it very difficult to pass through email.

Preview in Leopard allows you to make multipage PDFs, but it also allows you to save PDFs with compression. The technique is as easy as:

Choose File > Save As, choose Reduce File Size from the Quartz Filter pop-up menu, and choose a name and location for the new PDF file.
from: MacNN Forums- "Compress" PDF Missing in Leopard
The resulting file size was good (488K), but the quality was terrible.

To remedy this:
  1. 1. Open ColorSync Utility. It is located in the Applications/Utilities folder.
  2. 2. In the toolbar, click Filters
  3. 3. Select the Reduce File Size filter
  4. 4. Click the downward-pointing triangle to the right of the filter’s name and select Duplicate Filter. A new filter will be created. Rename the filter as necessary.
  5. 5. In the Image Sampling section of the new filter, Max Pixels is set to 512. Set it to 1024.
  6. 6. Try the Preview Save As technique again, selecting your new filter as the Quartz filter.
  7. 7. Open the original PDF, zoom a section of the document 2-3 times and use it as a baseline to compare to the same section zoomed 2-3 times in a PDF saved with the new settings.
  8. 8. Repeat Steps 6 and 7, changing the Max Pixels in increments of 256 or 512 until the desirable resolution quality is reached. I have my own Max Pixels set to 1536, which results in the 15.4MB file compressed to 3.2MB.
  9. 9. If further compression is needed, slide the compression slider control to the left until quality limits are met. After adjustments, my 15.4MB file now results in a 1.9MB file.
For more info, see "Editing Quartz Filters" from OS X help.

Saturday, March 21, 2009

Creating an HD Movie for Windows

My daughter had an assignment for third grade to create a multimedia presentation on ants. Instead of the normal PowerPoint presentation, we decided to create a movie presentation in iMovie, using footage from a Nikon D90 (photos and 720p video).

We learned that the school had Windows computers with only minimal installs. This rules-out an mp4, m4v or mov file. Our best bet was creating an avi file. My goal was to keep the quality of the movie as 720p.

Unfortunately, AVI support in iMovie is not robust. When using the Share/Export to QuickTime... option in iMovie, the Movie to MPEG-4 and Movie to QuicktimeMovie export options allow the user to select various resolutions, 1080p maximum. Movie to AVI does not allow the user to select a resolution, only an aspect (4:3 or 16:9). The following tests were run using "best quality" for each of the exports:
  • iMovie QT AVI: Apple Cinepak, no key frames, data 4000kBps, best qual, 960x540, 30 fps, 570.06MB, 33.93mbps
  • iMovie QT AVI: DV, 720x576 (1024x576), 30 fps, 592.77MB, 35.28mbps
  • iMovie QT AVI: DV/DVCPRO-NTSC, best FPS, best qual, prog/16:9, 720x480 (853x480), 30 fps, 495.95MB, 29.52mbps
  • iMovie QT AVI: DVCPRO50-PAL, best fps, best qual, scan progressive, 16:9: 720x576 (1024x576), 30 fps, 1.15GB, 69.86mbps
  • iMovie QT AVI: no compression, best fps, millions of colors+, best qual: 960x540, 30 fps, 8.18GB, 500mbps (error: not fully playable)
Different codecs result in different file sizes, but surprisingly, quality was not consistent. The following sample is from the larger, higher bitrate, higher resolution, DVCPRO50-PAL export listed above (click the picture to see it in full size).


The next sample comes from the Apple Cinepak codec (click the picture to view the better quality).


To get the 720p resolution, I exported the movie from iMovie as a QuickTime movie (mov) and used ffmpegx to convert it to an MS-MPEG4, version 2 AVI.
  • from iMovie: mov (iMovie QT, 1280x720, current fps, auto kf & dr, qual best, encode best, H.264, 30 fps, 191.64MB, 11.38mbps)
  • from ffmpegx: avi (MS-MP4 V2, 1280x720, 30 fps, 69.60MB, 4134kbps)
This last sample comes from the ffmpegx avi (click the picture to view the larger size/video resolution):


The MSMP4v2 file worked great at my daughter's school. It natively runs in Media Player on both Windows Vista and Windows 7.

It's too bad that Apple doesn't have better compatibility with Windows. Why can't we get Windows HD-quality video directly from iMovie?

Sunday, February 22, 2009

Finally, FREE virtualization on OS/X

For a good part of last year, I was very upset with the latest Parallels product. I had a Windows Vista VM running awhile for work use. One of the Parallels upgrades went bad. I attempted to revert back, but could not get past a black screen, no matter what I did. Safe mode and attempting to install generic video drivers using Windows-PE did not work. Parallels customer support attempted to help, but their recommendations were not getting me anywhere.

Luckily, the Vista VM hard drive file was not corrupted, so I was able to get my data using a Windows-XP Parallels VM.

After this experience, I did not feel like pouring more money into Parallels or another VM tool, such as VMWare Fusion. VMWare has been free on Windows and Linux for years...why pay for it on OS/X? I came across VirtualBox for the Mac in the latter part of last year, as a recommendation from a friend. Configuration is almost as easy as Parallels, and has a similar look-and-feel between various OSs.

Windows 7 has been noted to run slower in VirtualBox than in Parallels or Fusion. The best performance ranking goes to VMWare, Parallels, then VirtualBox.

I do not run Windows games, and do most of my work in OS/X. I am very happy with VirtualBox.

Saturday, February 21, 2009

Time Machine Reference


(originally published 2/5/2008)

Time Machine is a new concept in automated backups. Documentation is slow to come, but I have been able to find tidbits of information on the web. Most reviews have been positive.

Without getting too far into what a good backup strategy should provide, a backup strategy should allow for the following:
  • System-level backups (the entire system)
  • File-level backups (individual files, viewable through the OS/in Finder)
  • Application-level backups (items within an application, such as a photo in iPhoto, a contact in Address Book, an email in Mail)
Although Time Machine system-level backups are not bootable, Time Machine handles all 3 levels, and does it very well.

History (prior to OS/X Leopard)
For system-level backups, OS X has had disk cloning (also known as "bootable backups") for some time now. Super Duper and Carbon Copy Cloner were created to add a GUI to OS X disk cloning support.

In the Tiger days, Apple recommended .mac or third-party tools for file-level backups, although the Unix utility rsync was available for advanced users.

Application-level backups were handled within each individual application, as long as the application included backup support. Even today, Time Machine application-level backups are only supported by a small number of apps.

Technical Details
Rsync uses a *nix functionality called Hard Links to make space-efficient backups. Multiple hard links to the same file or folder are also known as multi-links. Apple had "...designed the multi-links in HFS+ primarily to support Time Machine. Unlike other Unix or Linux distros, Mac OS X's multi-links support hard linking to both files and directories. Creating multiple hard links to directories is outlined in the official POSIX specification for Unix, but is rarely supported because the use of multiple hard links for directories is dangerously powerful. If a child directory linked to its own parent, it would create a directory cycle that could cause unbridled looping and file system corruption. File system utilities are also typically unprepared to handle multi-linked files. In Time Machine, multi-links are used in a specific, controlled context to avoid these types of problems. " Linux does have similar solutions to Time Machine, but do still not match the speed and space-saving features of OS X.

Large files, such as DMG files and VM images, are not handled well by Time Machine. Because Time Machine uses hard links in incremental backups, any change in the large file results in the entire file being copied over, not just the change itself. Leopard also introduced sparse bundle disk images so that large files (such as regular sparse disk images) could work better with Time Machine. The images are "mountable directories full of banded data in 8M chunks" to separate the physical disk image from the logical one. This is a step in the right direction, but still has a few kinks to work-out. Some users have attempted to use sparse bundles as a large file backup solution, but tests have mixed results.

Other than large files, Time Machine has had some complaints, but are continuing to address those complaints with the latest OS X service packs. One of the problems involves not being able to backup live File Vaults.

How it Works
Time Machine creates hourly, daily and weekly backups. As I mentioned in a separate blog post, Time Machine is "self-maintaining". As the drive that holds your backups begins to run out of space, the oldest backups will be automatically deleted to make room for the newest backups. To put it simple, configure Time Machine, and let it go.

The Time Machine icon displays at the top of the screen and animates/turns during a backup. To force a backup, click the icon and select "Back Up Now" from the pop-up menu. Otherwise, automatic backups will occur.

The term "self-maintaining" may apply only to a certain point. Although I have not seen this issue myself, some users have noted a "not enough space on hard drive" error message, but have been able to get past the error by expanding their backup storage or upgrading the backup hard drive.

Set-up
Before starting Time Machine, it is recommended to use a backup drive that has at least 2x the total storage being backed-up. A dedicated external drive or a Time Capsule are recommended. Time Machine cannot backup to flash drives.

Apple recommends Time Capsule as backup storage for Time Machine. Time Capsule will allow for backups over a network. I personally use Time Capsule and have not noticed any issues after experiencing problems using a 1TB external Fantom drive enclosure. Storage on Time Capsule can be expanded with an added USB external drive, and Drobo appears to be a good expansion solution. For the more adventurous, unofficial directions note how to replace the Time Capsule hard drive.

First of all, make sure the latest Time Machine updates are installed. Many of the problems referenced in this article by other users have been fixed in the latest updates.

Configuration is VERY simple. Click the icon and select "Open Time Machine Preferences..." (you may also open the preferences by navigating through system preferences). "Change Disk" changes the backup location. "Options..." will display a list of items that will not be backed-up. Time Machine can be turned on/off at any time by moving the big slide button.

For the backup location, note that external drives will appear as separate backup shares; a backup cannot span multiple hard drives.
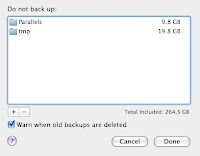
In the Do not back up settings within "Options..." mentioned above, external hard drives connected to the main computer are not backed-up by default. The drives can be removed from the list and will be backed-up by Time Machine, if necessary. Good candidates for the exclusion list would include large files that change frequently and temporary/working directories.

Restoring Data

Restoring individual items
Time Machine can restore file-level items just like any other backup tool. To do so, open Finder, then select "Enter Time Machine" from the The Time Machine icon menu. Opening Finder is not required unless you are using one of the applications mentioned in the next paragraph. Finder will be surrounded by a space theme, including a timeline on the right-hand side, and a restore button at the bottom of the screen. Select a timeline, navigate to the items to restore, and click "Restore". Your files can be restored to wherever you like.

One of the best parts of Time Machine is that iPhoto, Address Book, and Mail items can be restored without having to worry about the underlying file system (application-level backups). Open one of these apps, enter Time Machine as mentioned above, and restore the items as mentioned above from the application itself. Very intuitive.

Restoring an internal drive
Recently, I performed the following steps after upgrading my hard drive. The initial restore is painless, and took me a little over 4 hours for approximately 200GB of data. Re-enabling Time Machine is another challenge, but is not overly difficult.
  1. Restore from Time Machine. The unofficial Time Machine restore guide is also a good resource. It did take 20 minutes or so to get past the "Calculating space required to restore data" part, but some folks have noted a bit of patience is needed for this step.
  2. Re-enable Time Machine backups
  3. Mount the old hard drive and see if anything is needed from it before reformatting it. Some files are not backed-up by Time Machine, but they are mainly system files for caching and logs.
Restoring external hard drives
Restoring external hard drives can be a little tricky. External drives will not appear in the Time Machine restore utility unless they are mounted (connected) in Leopard. The bright side is that the mounted drives must only have the same name as the drives that were backed-up. Drive make and size does not matter.
  1. If you do not recall the name of the external drive you are restoring from (e.g. from a drive crash) you can determine this by "browsing the contents of your Time Machine drive in the Finder (Not in Time Machine). Double-click on the drive you are backing up to and you’ll see a folder named, 'Backups.backupdb'. In that folder will be a folder that has the same name as you computer. In that folder you’ll see a folder called, 'Latest'." Find the names of the external drives here.
  2. Create a disk image in Disk Utility with the same name as the missing drive and mount the image. If you are replacing an external drive, you can also name the drive using the same name as the old drive.
  3. You will now be able to use the Time Machine restore utility to restore files from the previously unmounted external hard drive.

Tips