I recently had a 12-page PDF that saved as a 15.4MB file, making it very difficult to pass through email.
Preview in Leopard allows you to make multipage PDFs, but it also allows you to save PDFs with compression. The technique is as easy as:
Choose File > Save As, choose Reduce File Size from the Quartz Filter pop-up menu, and choose a name and location for the new PDF file.
from: MacNN Forums- "Compress" PDF Missing in LeopardThe resulting file size was good (488K), but the quality was terrible.
To remedy this:
- 1. Open ColorSync Utility. It is located in the Applications/Utilities folder.
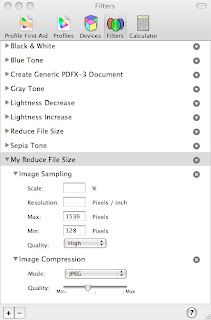
- 2. In the toolbar, click Filters
- 3. Select the Reduce File Size filter
- 4. Click the downward-pointing triangle to the right of the filter’s name and select Duplicate Filter. A new filter will be created. Rename the filter as necessary.
- 5. In the Image Sampling section of the new filter, Max Pixels is set to 512. Set it to 1024.
- 6. Try the Preview Save As technique again, selecting your new filter as the Quartz filter.

- 7. Open the original PDF, zoom a section of the document 2-3 times and use it as a baseline to compare to the same section zoomed 2-3 times in a PDF saved with the new settings.
- 8. Repeat Steps 6 and 7, changing the Max Pixels in increments of 256 or 512 until the desirable resolution quality is reached. I have my own Max Pixels set to 1536, which results in the 15.4MB file compressed to 3.2MB.
- 9. If further compression is needed, slide the compression slider control to the left until quality limits are met. After adjustments, my 15.4MB file now results in a 1.9MB file.
 For more info, see "Editing Quartz Filters" from OS X help.

No comments:
Post a Comment