Showing posts with label Leopard. Show all posts

Monday, September 28, 2009

Snow Leopard Features & Quirks: Finder


The Finder in OS X Snow Leopard 10.6 is not exactly the same Finder application that was in Leopard 10.5. Rewriting an application has obvious advantages, but can also introduce new issues. I will try to highlight both below within a features list.

  • Performance: Rewritten in Cocoa for Snow Leopard, so Finder is more responsive from top to bottom. Add 64-bit support and Grand Central Dispatch (which makes Finder multi-core-capable) to the list. Navigating around mounted volumes is also faster.
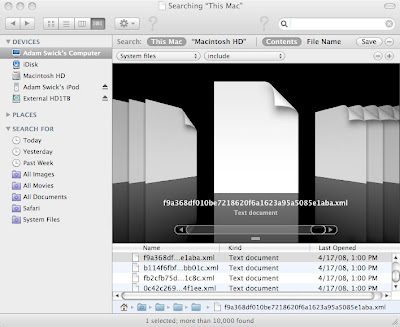
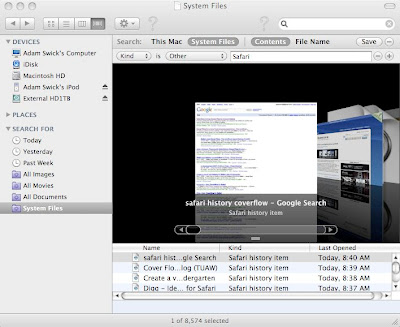
  • Spotlight: Customizable Spotlight search locations. Using View/Show View Options (Action/Show View Options, or cmd-J), adjust view options and sortable search results. According to some users, these last 2 features were Leopard 10.5 bugs and available options in OS X Tiger. iChat buddies can also be searched in Spotlight.
Users can also search iPhoto Faces and Places in Spotlight. Spotlight should index Faces and Places in iPhoto '09, but I had to force OS X to reindex first. After reindexing, Spotlight now appears to be much slower than before. I moved contacts to the top of the Spotlight "seach results" in preferences, but it appears to be one of the last categories populated during a search. Strange.

  • Icons: Enhanced live icon previews that let you thumb through a multipage document or watch a QuickTime movie. This is all done using the icons themselves, but I can't seem to get it to work on Word docs (.doc or .docx), although it does work on Pages docs. Finder also supports larger icon sizes up to 512x512.
  • Quick Look: Option-spacebar opens QL in full-screen mode. Selecting multiple items and then doing QL will include a button at the bottom of the QL window to switch between the selected items.
  • Column View: Select a folder in column view and press cmd-a it will select all the folders and files in that folder's containing folder, rather than all the items inside the folder itself.
  • Trash: Restore deleted items to original folders. Right click (or option click) on any item in the trash. When the contextual menu pops up, you should see an option that says "put back." Alternatively, you can also find that option in the action menu when you have your trash open. I did find that the "put back" feature is not consistent. Doing a "move to trash" from Finder will give me a "put back" option in the Trash, but doing a "move to trash" from Preview will not produce a "put back" option in the Trash.
  • Pinch & open multitouch gesture when in a finder window in icon view changes the size of the icons (works on desktop, too.). The same gesture in cover-flow view changes the size of the cover-flow window.
  • More reliable disk eject. The Finder will tell you which application is keeping a disk from being ejectable. Half bug fix, half user enhancement. In OS X 10.5, the message just stated the device was busy.
  • Flagged viruses. Snow Leopard has basic malware protection for Safari downloads. If you download an executable that contains a virus, the OS will warn you, and recommend you abort. Files that are infected will be marked as such in the Finder
  • Removable sidebar headers. If you prefer a minimal sidebar, you can remove all items under a sidebar header (Devices, Shared, Places, Search For). The sidebar header will then disappear. This is another "feature" that actually might be classified a bug fix.
  • Stacks. Stacks has had some improvements in Snow Leopard, but, unfortunately is still just a glorified document/application launcher, missing many of the Finder features noted above. I will cover Stacks in a separate article.

References
http://support.apple.com/kb/HT3737
http://www.apple.com/macosx/refinements/
http://www.apple.com/macosx/what-is-macosx/dock-and-finder.html
http://www.apple.com/macosx/refinements/enhancements-refinements.html
http://www.tuaw.com/2009/08/31/a-pawful-of-quick-snow-leopard-tips/2
http://www.geeksrus.com/category/apple/macintosh/snow-leopard/
http://www.h2hreviews.com/blog/Snow-Leopard-fot-Photographers.html
http://www.mis-asia.com/news/articles/11-major-new-snow-leopard-features
http://www.gizmodo.com.au/2009/09/15-snow-leopard-tricks-you-have-to-try/
http://www.macworld.com/article/141038/2009/06/106features.html
http://www.maclife.com/article/feature/100_snow_leopard_tips_tricks_and_features
http://www.crunchgear.com/2009/06/08/getting-to-know-grand-central-dispatch-opencl-and-your-64-bit-os/

http://thesmallwave.com/2009/08/31/discoveries-in-mac-os-x-snow-leopard-the-finder/

Friday, March 27, 2009

Tweaking PDF compression in Leopard

If you are like me and sometimes scan printed copies, article pages and such into PDFs, then you will notice that a multipage PDF will eventually become rather large as more pages are added. This is because the entire PDF consists of images.

I recently had a 12-page PDF that saved as a 15.4MB file, making it very difficult to pass through email.

Preview in Leopard allows you to make multipage PDFs, but it also allows you to save PDFs with compression. The technique is as easy as:

Choose File > Save As, choose Reduce File Size from the Quartz Filter pop-up menu, and choose a name and location for the new PDF file.
from: MacNN Forums- "Compress" PDF Missing in Leopard
The resulting file size was good (488K), but the quality was terrible.

To remedy this:
  1. 1. Open ColorSync Utility. It is located in the Applications/Utilities folder.
  2. 2. In the toolbar, click Filters
  3. 3. Select the Reduce File Size filter
  4. 4. Click the downward-pointing triangle to the right of the filter’s name and select Duplicate Filter. A new filter will be created. Rename the filter as necessary.
  5. 5. In the Image Sampling section of the new filter, Max Pixels is set to 512. Set it to 1024.
  6. 6. Try the Preview Save As technique again, selecting your new filter as the Quartz filter.
  7. 7. Open the original PDF, zoom a section of the document 2-3 times and use it as a baseline to compare to the same section zoomed 2-3 times in a PDF saved with the new settings.
  8. 8. Repeat Steps 6 and 7, changing the Max Pixels in increments of 256 or 512 until the desirable resolution quality is reached. I have my own Max Pixels set to 1536, which results in the 15.4MB file compressed to 3.2MB.
  9. 9. If further compression is needed, slide the compression slider control to the left until quality limits are met. After adjustments, my 15.4MB file now results in a 1.9MB file.
For more info, see "Editing Quartz Filters" from OS X help.

Saturday, March 21, 2009

Creating an HD Movie for Windows

My daughter had an assignment for third grade to create a multimedia presentation on ants. Instead of the normal PowerPoint presentation, we decided to create a movie presentation in iMovie, using footage from a Nikon D90 (photos and 720p video).

We learned that the school had Windows computers with only minimal installs. This rules-out an mp4, m4v or mov file. Our best bet was creating an avi file. My goal was to keep the quality of the movie as 720p.

Unfortunately, AVI support in iMovie is not robust. When using the Share/Export to QuickTime... option in iMovie, the Movie to MPEG-4 and Movie to QuicktimeMovie export options allow the user to select various resolutions, 1080p maximum. Movie to AVI does not allow the user to select a resolution, only an aspect (4:3 or 16:9). The following tests were run using "best quality" for each of the exports:
  • iMovie QT AVI: Apple Cinepak, no key frames, data 4000kBps, best qual, 960x540, 30 fps, 570.06MB, 33.93mbps
  • iMovie QT AVI: DV, 720x576 (1024x576), 30 fps, 592.77MB, 35.28mbps
  • iMovie QT AVI: DV/DVCPRO-NTSC, best FPS, best qual, prog/16:9, 720x480 (853x480), 30 fps, 495.95MB, 29.52mbps
  • iMovie QT AVI: DVCPRO50-PAL, best fps, best qual, scan progressive, 16:9: 720x576 (1024x576), 30 fps, 1.15GB, 69.86mbps
  • iMovie QT AVI: no compression, best fps, millions of colors+, best qual: 960x540, 30 fps, 8.18GB, 500mbps (error: not fully playable)
Different codecs result in different file sizes, but surprisingly, quality was not consistent. The following sample is from the larger, higher bitrate, higher resolution, DVCPRO50-PAL export listed above (click the picture to see it in full size).


The next sample comes from the Apple Cinepak codec (click the picture to view the better quality).


To get the 720p resolution, I exported the movie from iMovie as a QuickTime movie (mov) and used ffmpegx to convert it to an MS-MPEG4, version 2 AVI.
  • from iMovie: mov (iMovie QT, 1280x720, current fps, auto kf & dr, qual best, encode best, H.264, 30 fps, 191.64MB, 11.38mbps)
  • from ffmpegx: avi (MS-MP4 V2, 1280x720, 30 fps, 69.60MB, 4134kbps)
This last sample comes from the ffmpegx avi (click the picture to view the larger size/video resolution):


The MSMP4v2 file worked great at my daughter's school. It natively runs in Media Player on both Windows Vista and Windows 7.

It's too bad that Apple doesn't have better compatibility with Windows. Why can't we get Windows HD-quality video directly from iMovie?

Saturday, February 21, 2009

Time Machine Reference


(originally published 2/5/2008)

Time Machine is a new concept in automated backups. Documentation is slow to come, but I have been able to find tidbits of information on the web. Most reviews have been positive.

Without getting too far into what a good backup strategy should provide, a backup strategy should allow for the following:
  • System-level backups (the entire system)
  • File-level backups (individual files, viewable through the OS/in Finder)
  • Application-level backups (items within an application, such as a photo in iPhoto, a contact in Address Book, an email in Mail)
Although Time Machine system-level backups are not bootable, Time Machine handles all 3 levels, and does it very well.

History (prior to OS/X Leopard)
For system-level backups, OS X has had disk cloning (also known as "bootable backups") for some time now. Super Duper and Carbon Copy Cloner were created to add a GUI to OS X disk cloning support.

In the Tiger days, Apple recommended .mac or third-party tools for file-level backups, although the Unix utility rsync was available for advanced users.

Application-level backups were handled within each individual application, as long as the application included backup support. Even today, Time Machine application-level backups are only supported by a small number of apps.

Technical Details
Rsync uses a *nix functionality called Hard Links to make space-efficient backups. Multiple hard links to the same file or folder are also known as multi-links. Apple had "...designed the multi-links in HFS+ primarily to support Time Machine. Unlike other Unix or Linux distros, Mac OS X's multi-links support hard linking to both files and directories. Creating multiple hard links to directories is outlined in the official POSIX specification for Unix, but is rarely supported because the use of multiple hard links for directories is dangerously powerful. If a child directory linked to its own parent, it would create a directory cycle that could cause unbridled looping and file system corruption. File system utilities are also typically unprepared to handle multi-linked files. In Time Machine, multi-links are used in a specific, controlled context to avoid these types of problems. " Linux does have similar solutions to Time Machine, but do still not match the speed and space-saving features of OS X.

Large files, such as DMG files and VM images, are not handled well by Time Machine. Because Time Machine uses hard links in incremental backups, any change in the large file results in the entire file being copied over, not just the change itself. Leopard also introduced sparse bundle disk images so that large files (such as regular sparse disk images) could work better with Time Machine. The images are "mountable directories full of banded data in 8M chunks" to separate the physical disk image from the logical one. This is a step in the right direction, but still has a few kinks to work-out. Some users have attempted to use sparse bundles as a large file backup solution, but tests have mixed results.

Other than large files, Time Machine has had some complaints, but are continuing to address those complaints with the latest OS X service packs. One of the problems involves not being able to backup live File Vaults.

How it Works
Time Machine creates hourly, daily and weekly backups. As I mentioned in a separate blog post, Time Machine is "self-maintaining". As the drive that holds your backups begins to run out of space, the oldest backups will be automatically deleted to make room for the newest backups. To put it simple, configure Time Machine, and let it go.

The Time Machine icon displays at the top of the screen and animates/turns during a backup. To force a backup, click the icon and select "Back Up Now" from the pop-up menu. Otherwise, automatic backups will occur.

The term "self-maintaining" may apply only to a certain point. Although I have not seen this issue myself, some users have noted a "not enough space on hard drive" error message, but have been able to get past the error by expanding their backup storage or upgrading the backup hard drive.

Set-up
Before starting Time Machine, it is recommended to use a backup drive that has at least 2x the total storage being backed-up. A dedicated external drive or a Time Capsule are recommended. Time Machine cannot backup to flash drives.

Apple recommends Time Capsule as backup storage for Time Machine. Time Capsule will allow for backups over a network. I personally use Time Capsule and have not noticed any issues after experiencing problems using a 1TB external Fantom drive enclosure. Storage on Time Capsule can be expanded with an added USB external drive, and Drobo appears to be a good expansion solution. For the more adventurous, unofficial directions note how to replace the Time Capsule hard drive.

First of all, make sure the latest Time Machine updates are installed. Many of the problems referenced in this article by other users have been fixed in the latest updates.

Configuration is VERY simple. Click the icon and select "Open Time Machine Preferences..." (you may also open the preferences by navigating through system preferences). "Change Disk" changes the backup location. "Options..." will display a list of items that will not be backed-up. Time Machine can be turned on/off at any time by moving the big slide button.

For the backup location, note that external drives will appear as separate backup shares; a backup cannot span multiple hard drives.

In the Do not back up settings within "Options..." mentioned above, external hard drives connected to the main computer are not backed-up by default. The drives can be removed from the list and will be backed-up by Time Machine, if necessary. Good candidates for the exclusion list would include large files that change frequently and temporary/working directories.

Restoring Data

Restoring individual items
Time Machine can restore file-level items just like any other backup tool. To do so, open Finder, then select "Enter Time Machine" from the The Time Machine icon menu. Opening Finder is not required unless you are using one of the applications mentioned in the next paragraph. Finder will be surrounded by a space theme, including a timeline on the right-hand side, and a restore button at the bottom of the screen. Select a timeline, navigate to the items to restore, and click "Restore". Your files can be restored to wherever you like.

One of the best parts of Time Machine is that iPhoto, Address Book, and Mail items can be restored without having to worry about the underlying file system (application-level backups). Open one of these apps, enter Time Machine as mentioned above, and restore the items as mentioned above from the application itself. Very intuitive.

Restoring an internal drive
Recently, I performed the following steps after upgrading my hard drive. The initial restore is painless, and took me a little over 4 hours for approximately 200GB of data. Re-enabling Time Machine is another challenge, but is not overly difficult.
  1. Restore from Time Machine. The unofficial Time Machine restore guide is also a good resource. It did take 20 minutes or so to get past the "Calculating space required to restore data" part, but some folks have noted a bit of patience is needed for this step.
  2. Re-enable Time Machine backups
  3. Mount the old hard drive and see if anything is needed from it before reformatting it. Some files are not backed-up by Time Machine, but they are mainly system files for caching and logs.
Restoring external hard drives
Restoring external hard drives can be a little tricky. External drives will not appear in the Time Machine restore utility unless they are mounted (connected) in Leopard. The bright side is that the mounted drives must only have the same name as the drives that were backed-up. Drive make and size does not matter.
  1. If you do not recall the name of the external drive you are restoring from (e.g. from a drive crash) you can determine this by "browsing the contents of your Time Machine drive in the Finder (Not in Time Machine). Double-click on the drive you are backing up to and you’ll see a folder named, 'Backups.backupdb'. In that folder will be a folder that has the same name as you computer. In that folder you’ll see a folder called, 'Latest'." Find the names of the external drives here.
  2. Create a disk image in Disk Utility with the same name as the missing drive and mount the image. If you are replacing an external drive, you can also name the drive using the same name as the old drive.
  3. You will now be able to use the Time Machine restore utility to restore files from the previously unmounted external hard drive.

Tips

Wednesday, November 12, 2008

Using an HD camera with iLife and Apple TV

How do I view HD home movie content on Apple TV?

If this all worked the way I personally think it should, I would be able to automatically import pictures from my HD video camera into iPhoto, change the movie names as needed, and have the movies referenced automatically in iTunes to stream to Apple TV where I can play the movies from a "Home Movies" category. Seamless integration. Unfortunately, it is not this easy yet.

Problems with the above workflow include:

1. iPhoto metadata does not transfer to iTunes
2. iTunes does not have a "Home Movies"" category, only Movies and TV Shows.
3. Apple TV requires specific formats to play.

I use the following workaround steps to help me in this endeavor.


Part I: Storing Home Movies in iPhoto

1. Mount your video camera and do NOT import into iPhoto. First, copy the videos to a temporary directory and rename them to something meaningful.

Example follows

WAS: FILE0021.MOV
NOW: 2008-06 In front of Cinderella's castle (HD).MOV

2. Make sure all of the file dates are correct and fix as necessary. As a general rule, double-check the date/time camera feature prior to recording.

3. In iPhoto, from the menu, do a File/Import to Library... and select the temporary directory created in step 1. A new event should be created, just as it is when photographs are imported. I also store photographs in iPhoto, so I normally merge my home movies into my photograph events.

4. Note that once a file is imported into iPhoto, moving the file to a new location in Finder will make iPhoto lose its reference to the movie. Movies are now a part of the iPhoto Library and should be renamed, moved to other events, etc. using iPhoto itself.


Part II: Sharing Home Movies in iTunes

1. Click and drag (with option) your home movies from iPhoto into iTunes. Because you are holding down the option key while doing this, the movies will not be copied into your iTunes library. Only a reference to the movie stored in iPhoto will be copied into iTunes. You can verify this by noting the green plus sign icon (copy) disappears when clicking the option key.

2. The home movies will automatically be moved into the Movies section of your iTunes library. Select all of the home movies and do a right-click/Get Info (or command-i). The Multiple Item Information window should appear.

3. In the Video tab, select Show and enter "Home Movies". In the Options tab, select Media Kind and "TV Show" in the selection list. Click Ok.


Part III: Converting HD Home Movies for Apple TV

If you can sync or stream the original home movie content to Apple TV, you are lucky. A 1080i/p HD camera will require conversion to be viewable on Apple TV.

The various conversion tools either use open source (known a ffmpeg) or OS X native (Quicktime) libraries. Picking one over the other is personal preference.

Note that once a file is referenced in iTunes, moving the file to a new location in Finder is ok. iTunes will automatically update its reference to the movie. I like to keep my original home movies in iPhoto and store the converted movie(s) in either the Movies folder or an external drive. This keeps the iTunes library small, including only music content.

Testing the conversion tools

VisualHub made use of the open source ffmpeg libraries, but is no longer available. I prefer the ffmpegX shareware utility (using saved presets) for quality and speed, although iMovieHD is good for editing purposes. Quicktime Pro uses the same export features that iMovieHD does.

Note that for Apple TV conversion, video content can be optimized for either smoothness or clarity. This is achieved by varying the framerate and resolution settings. When possible, I attempted maximum resolution with a lower (24fps) framerate. Apple TV highlights resolutions of 720p and higher as HD content and in my opinion 720p looks much clearer on a larger screen.

movie source
: Aiptek Go-HD camera, 1280x720, 30fps, 4000kbps, .mov, 4.4mb

Best Quality
ffmpegx: 1280x720, 24fps, 2784kbps, .mp4, 2.9mb. Uses x264 codec and appears as HD content in Apple TV.
iMovieHD: 1280x720, 24fps, 4275kbps, .mp4, 4.4mb. Uses Quicktime Expert settings/Movie to MP4/MP4, H.264, 4000kbps, optimized for CD/DVD-ROM, 1280x720 HD, 24fps

Easiest
iTunes rt-click, Create Apple TV Version: 960x540, 30fps, 3950kbps, .m4v, 4.1mb

Fastest
Elgato Turbo.264 software (with hardware H.264 encoder): 960x540, 15fps, 3245kbps, .mp4, 3.3mb
Elgato Turbo.264 software (with hardware H.264 encoder, enhanced to 30fps): 960x540, 30fps, 3239kbps, .mp4, 3.3mb
iMovieHD with Elgato turbo.264 hardware encoder: 960x540, 30fps, 3250kbps, .mp4, 3.3mb

source file

Quicktime libraries

ffmpeg libraries


References
Macworld conversion guide
Arstechnica video conversion guide for Apple TV
Apple Quicktime H.264 conversion guide

Saturday, May 31, 2008

Time Machine vs. Windows Backup

Comparing Time Machine to Vista's Backup Solution

TypesBoth Vista and Leopard offer two backup methods as part of their standard backup solution: file-level and complete/cloned backup.

Flexibility: Vista's backup is more configurable than Time Machine and Vista also offers incremental backups on cloned images. Leopard's backup solution is self-maintaining and Vista's is not.

Size Management: Leopard uses hard links to reduce backup disk space requirements and Vista does not.  

Contextuality: The best thing about Time Machine is its contextual restore capabilities. Windows has the "Backup and Restore Center", while Time Machine restores are done intuitively from within the application being used, which currently includes Finder, iPhoto, Address Book, and Mail.

Media Comparisons: PC Magazine had a mostly erroneous article comparing Vista and Leopard backup solutions. Specifically:

1. "...image-based bare-metal restore with the MS version" in the "expensive version of Vista."

This is just not true. Although Time Machine does not have disk cloning, Leopard does have cloning as described above.

2. "
Vista does block-level incremental backups to help conserve drive space and decrease backup time. "

Another half-truth. #1 and #2 go together and will not apply to the normal home user. All that is available to the home user is the file backup method on Vista, while file backup and cloning are available to the Mac user (advantage: OS X).

For the business/enterprise user, block-level incrementals are not performed in Leopard. Block-level incrementals have been disputed as to their effectiveness, and t
hird party backup utilities such as Carbon Copy Cloner support block-level incrementals on OS X. Advantage: Vista.

Leopard also introduced sparse bundle disk images so that large files (such as regular sparse disk images) could work better with Time Machine.  This is a step in the right direction, but still has a few kinks to work-out.

Because of block-level and sparse bundle disk images, this topic is a draw. 

3. "
Vista's backup works over a network"

This was true when Leopard was initially released, but OS X 10.5.2 enabled Time Machine backups over a network.  Apple also released Time Capsule, for Time Machine backups to standalone network-based (NAS) storage.


(originally published 2/5/2008)

Friday, May 30, 2008

Time Capsule


The reviews for Time Capsule have been good overall.  It appears the main issue that plagues Time Capsule is the "Apple TV" syndrome, in that the public does not really know what Time Capsule should be used for, or are attempting to use it for unsupported purposes.

What Time Capsule can do:
Apple advertises the following functionality for Time Capsule.  Asterisked features are also present in Apple's Airport Extreme Base Station.
  • Automatic backup with Time Machine
  • Server-grade storage
  • *Easy wireless networking
  • *Up to 5x the performance, 2x the range
  • Wireless drive sharing
  • *Print without wires
  • *Strong security and access control
  • *Works with iPhone, Apple TV and more
Time Capsule is therefore a NAS and wireless solution designed to work with Time Machine over the network.   Although networked Time Machine backups can also be done on a networked external drive or third-party NAS solution, Time Capsule offers an all-in-one, fast and easy wireless backup solution.


What Time Capsule can't do:
  • Time Machine AND File Storage: Using Time Capsule for both Time Machine backups and file sharing is not recommended since Time Machine claims as much disk space as possible.  This has lead some folks to try and circumvent Time Machine, but have found that Time Capsule cannot be partitioned easily.  Solutions have been noted to create sparseimage files on Time Capsule to segregate your data, but it is still unclear as to whether or not the image files will get overwritten as the Time Capsule disk fills-up.  Other solutions try to limit the space used by Time Machine, but these solutions are also unclear as to the final results.
  • Migrate from old Time Machine Data: OS X Migration Assistant does not see old Time Machine backups when attempting to migrate to Time Capsule.  Many folks have attempted to migrate Time Machine backups through other means, but results are questionable.  Third-party utilities, such as SuperDuper, claim to have Time Machine backup migration capabilities.
  • Fast wireless backups over wireless-G.  Backups are extremely slow over wireless-G.  A good strategy for this situation involves an initial backup over the wire.

Current Issues
OS X 10.5.3 was released and added the capability to backup wirelessly using battery power.  After upgrading to 10.5.3, some users have noted issues with TM not updating Time Capsule and Time Machine also dropping the Internet connection, but TC and TM resets have fixed these issues.

Time Capsule does occasionally endure file system corruption, although some suggested fixes may help.  Hopefully 10.5.3 also prevents this from occurring, but it is hard to tell, since the fix "...includes fixes for Time Machine compatibility with Time Capsule."

Monday, April 28, 2008

Moving from Adium to iChat

I love Adium. Adium provides support for multiple IM services, including AOL, Yahoo, MSN, Google (Jabber). Adium consolidates multiple IM server connectivity under a single roof, but does it at a cost. Voice and video chat is not supported under Adium, although it may be supported in the future.

iChat provides many features over Adium, namely integrated audio/video and integration with OS X. The problem is that iChat can provide native support for AOL video and also supports Google chat (via Jabber), but will not support Yahoo or MSN chat.

Following are the steps necessary to "migrate" from Adium to iChat.

I. Setup a Jabber server for the unsupported services in iChat:

1. Find a Jabber server that supports Yahoo and MSN chat. The servers are still out there, but are getting harder to find.

2. Within Adium, add an account for the server. Click the Register New Account button to create a user id on the Jabber server.


3. Make sure the Jabber server is online in Adium. In Adium preferences, right-click the server in the Adium Accounts tab. Select Discovery Browser in the pop-up menu.


4. Double-click the transports you need to add to the Jabber server. You will be prompted for the user id and password for each transport.


II. Setup iChat to connect to the Jabber server, according to step 6 in the linked article.

You may also follow step 5 to integrate your Address Book contacts with iChat.


III. Install Chax to display a unified contact list.

The iChat/Chax All Contacts list will appear very similar to the one in Adium. All other iChat IM account lists can be closed once the All Contacts list is displayed.

Chax also offers support for Growl notifications. If you do use Growl, note that Chax turns on alerts for all IM events by default, but this can be tweaked within the Growl System Preference.


Problems

Adding and removing Yahoo IM accounts may not work within iChat. Accounts can always be added/removed from within the Yahoo IM client itself, or even Adium for that matter, but why?

Wednesday, April 23, 2008

Safari Cover Flow

In a recent SafariStand update, SafariStand brings Cover Flow to browser history.  Nice, but what about using Finder to browse/search in Coverflow along with Quicklook?  Mackindergarten has released a great tutorial on accessing Safari history from the Finder sidebar using SafariStand.

One problem noted with this method is that it is tied to a specific directory, (home) > Library > Caches > Metadata > Safari > History.  Apple may change the Safari cache location in a future Safari release.  Then again, they may not.  An alternative approach would be to use a non-location-based Smart Folder retrieve all of the "Safari" system components and view them in Finder/Coverflow.


First, click the space bar in the Spotlight search box in Finder.  Create a Finder query for the excluded system areas.  Delete the criteria (space) from the Spotlight box and click Save to create a Smart Form named "System Files".  Make sure the Add to Sidebar option is selected.


Next, select the first Smart Form in the left-hand side of Finder window.  Again, click the space bar in the Spotlight search box in Finder.  Select System Files for the Search: option and then click the plus (+) icon to add another criteria row.  Select "Kind is Other _____".  In the empty box, type Safari.  Now, click Save  to create a Smart Form named "Safari"


You can now select the Safari Smart Form and easily search/browse through Safari web history and bookmarks.  As a bonus, the System Files Smart Form can also be used to perform Finder Spotlight searches within the system files.

Monday, April 21, 2008

Text-Based Application Launchers

The dock in OS X works great for application launching, but there are times when you wish to quickly start an application that is not in the Dock.  A text-based launcher will allow a user to type in the first few letters of the application name and a selectable list will appear displaying matching applications.  Pick the one you need, and the application will start.
 
With OS X Tiger, I had used Quicksilver as an application launcher, due to the sluggishness of Tiger Spotlight.  A Leopard version of Quicksilver was released, but, unfortunately, Quicksilver is now no longer under support. With the new Spotlight peppiness in Leopard, I have begun comparing Spotlight against Quicksilver and have turned-off Quicksilver to see how well I adjust to life without it. QuickSilver is just plain fast, but the Leopard version of Spotlight is quite better than the Tiger version. I have not noticed a big difference in performance between Spotlight and Quicksilver as long as I set applications to the highest priority in Spotlight preferences.

Making Spotlight searches faster

Just after upgrading to Leopard, Spotlight was super-fast. After a few months, the speed has drastically gone downhill. Perhaps some of the Leopard fixes impacted Spotlight's speed? I then tweaked the Spotlight preferences a bit. If "Webpages" is unselected in the Spotlight preferences, my total search time is cut in about half. So...it must be my web cache. I tried keeping the setting turned off and separating web searches to Google Desktop, but it does not have the same effect. Safari history cover flow is great, even if it is in Finder.

So my second choice is to keep the setting selected, but move "Webpages" to the bottom of the Spotlight preferences list. This appears to help. As long as I am not searching for a webpage, results return quickly.

Another tweak involves removing unnecessary Spotlight indexing.  For example, an external hard drive used for Time Machine backups would probably not need indexing.  You may also monitor the size of the Spotlight index file to see the net effect of indexing exclusions.

Sunday, April 20, 2008

OS X Tiger Graveyard


It's time to bury those applications that no longer work or are not needed in Leopard.
  • PDFLab: I used PDFLab to combine PDFs together to make a single, multi-page PDF. You can now do this in Preview.
  • DockFun!: Stacks has now replaced this functionality.
  • Quicksilver: an update has been provided for Leopard, but it appears no further development will be done.
  • Chicken of the VNC: This was a great VNC client, but is it needed any more with the new Screen Sharing client in Leopard?
  • StuffIt Expander: For general use, there is a new Archive Utility built-into Leopard that is configurable.  File security, scheduled backups and support for multiple formats may drive the need for a third-party archive utility.
  • NewsFire: This little RSS manager was a great tool that included feed groupings.  Apple Mail now has RSS with Smart Mailboxes that provides the same functionality, as long as you can live with the Safari integration.

Saturday, April 19, 2008

How secure is Safari?


Nineteen days after Safari allowed a hacker to gain access to OS X, Apple released a browser patch.  The patch also fixes a cross-site scripting vulnerability.  The contest attack appears to have been a result of a heap overflow due to the way WebKit handles JavaScript regular expressions.

Apparently, the contest results have been the same for two years in a row, according to Slashdot. Looking deeper, though, last year's exploit was due to a QuickTime vulnerability that was accessed from Safari, not Safari itself.

Monday, April 14, 2008

Using Gmail with Apple Mail


I found some great tips for setting-up Apple Mail with IMAP.  This will allow you to use your gmail with multiple computers (e.g. work, home, iPhone, etc.).

After using it for about a week or so, I am thoroughly impressed.  Email does not take as much local disk space as I thought it might.  Also, IMAP allows you to move items to folders in Apple Mail and automatically archive the items in Gmail.  IMAP is a huge improvement over standard POP access.

To Do: An "Apple Mail To Do" label is automatically created in Gmail while the Apple Mail side shows 2 "To-Do" views in Mail: "On My Mac" and "Gmail".

Trash: A "Deleted Messages" label is automatically created in Gmail.  Deleting a message in Apple Mail applies the "Deleted Messages" label and archives the message.  When you right-click and select "Erase Deleted Messages..." in Apple Mail, deleted messages disappear completely from both Apple Mail and Gmail.  "Erase Deleted" messages are not moved to the Trash folder in Gmail.

Monday, February 11, 2008

Quick Look

You've gotta love this feature of Leopard, especially when using it in Finder along with Coverflow (spacebar and mouse scroll wheel).  Many plugins are now available for various file types.

Thursday, February 7, 2008

OS X Web Browsers

Camino
Camino has the best of both worlds: a lightweight OS X application built on top of the Mozilla engine. It is a lightweight Firefox.  OS X integration is built into the application, but not as much as Safari. After taking a look at version 1.5, the problems I see with Camino include:
  • Fewest extensions
  • Weak functionality (tabs are not draggable, no RSS reader)
Camino loads pages pretty fast, but I've gotta have my tab functionality!  Camino was my browser of choice a couple of years ago.

Firefox
Firefox was my browser of choice up until Safari 3 was released. The extension library is extensive. The browser functionality is customizable. Tabs are draggable and can be scrolled with your mouse. Problems include:
  • Performance. Firefox consumes the most resources and loads pages slowly.
  • Integration with OS X. URLs from Address Book are not viewable in bookmarks, as well as no OS X spell checker, services, or keychain access.
For performance, I found some information that was able to make Firefox run MUCH better in OS X by setting the following

Browser.sessionhistory.max_total_viewers = 5

As far as memory consumption goes, after applying the previous setting, Firefox appears to run approximately 40-45MB more than Camino, although both use the same Mozilla engine. For me, that is acceptable.

I do wish Firefox had more integration with OS X, so hopefully someone will create extensions for this in the future. I am also able to get Keychain access in OS X by using the 1Password application to control security.  Many folks are looking forward to the upcoming Firefox 3 for the Mac.

Safari
I had never been a fan of Safari. There were issues with website compatibility along with weak browser functionality.  Version 3 appears to have tackled these deficiencies, and you can't beat the OS X integration.  Tabbed browsing functionality is nice, but I would prefer to see tabs become more robust and configurable (e.g. favicons, thumbnails, and cache settings).  Out-of-the-box extension support like Firefox would be preferable as well.

There are also some plugins that make Safari a great browser.  I have become a huge fan of SafariStand and Inquisitor.  SIMBL is a hacking technique to apply patches (SIMBL plugins) to OS X functionality.  It is used to provide extensions to Safari.  SafariStand has extensive functionality, but documentation is hard to come by.  Coverflow/Quick Look with Safari web history is a nice add-on.


Statistics
It is interesting to see that a good share of OS X users are running Firefox.  Also, with all of the web 2.0/AJAX sites emerging, Javascript benchmarks are notable.


Summary
BrowseBack appears to be a utility with promise, a Time Machine for web history.  Reviews have been both positive and negative.  It works with all major browsers.

OS X in general has come quite far in browser compatibility. There are still those occasional websites that work on one browser, but not another. The current offering of browsers make OS X just as good or even better than Windows with the goal of being able to use one browser and one browser only.


Tuesday, February 5, 2008

Launchd

In researching mouse driver issues I had previously, I found a little about how how Apple currently recommends auto-starting applications.

Launchd
  • Why OS X uses launchd.
  • How to use launchd.

How to manually start and stop launchd:
  • start example: "sudo launchctl unload /System/Library/LaunchDaemons/com.apple.syslogd.plist"
  • stop example: "sudo launchctl load -w /System/Library/LaunchDaemons/org.amavis.amavisd.plist"

Friday, February 1, 2008

Live Disk Partitioning

Leopard OS X is supposed to offer non-destructive drive partitioning using Disk Utility. After I tried to partition my external drive in preparation for Time Machine, I received the following error:

No space left on device

No matter what I did, I received the same error and found some info regarding the error. So no resize yet, I suppose. Time Machine does appear to work correctly on a shared volume, but reports have it that Time Machine will delete all data from unsupported volumes.

Monday, January 28, 2008

Stacks Reference

History
Stacks
was introduced as a Leopard Dock extension for folder handling. Stacks was patented about 15 years ago by Apple and was called Piles. A Pile is "a loose grouping of documents. Its visual representation is an overlay of all the documents within the pile, one on top of the other, rotated to varying degrees...a pile on the desktop looked just like a pile on your real desktop."

It also appears that the beta release of Leopard delivered a slightly different Stacks solution that the final release did.


Controversy
Flat or hierarchical? Applications or documents? Big or small?

Comparing Tiger to Leopard, Stacks has replaced the simple pop-up folder list in the Dock with a more visually-appealing, flattened version that appears to be a true Dock extension. Some Leopard users are upset with the current implementation of Stacks, since hierarchical menus are no longer possible as they were under Tiger. It is rumored that Leopard update 10.5.2 will add hierarchical views as a third Stack view option.

Along with the hierarchy debate, functionality regarding document handling has been questioned. According to Apple documentation, the Dock "provides easy access to some of the Apple applications on your Mac...displays which applications are currently running, and holds windows in their minimized state. It's also the place to find the Trash...For your convenience, you can add your own applications, files, and folders to the Dock" It appears that applications, files and folders are not a major area of concern for the Dock or Stacks. Quick View and Cover Flow are not available in Stacks.

Only so many items can be displayed in a stack. You cannot scroll through all items in a stack, only the items that are displayed. Also, Stacks do not have a built-in Spotlight for searching. In its current form, fewer items in a Stack is better.


How to Use

Clicking and dragging a folder to the right-hand side of the dock will create a symbolic link to the folder and display the contents as a Stack. Hidden folders such as Trash and network shares can also be viewed as a Stack. The user may then launch applications from the Stack. Items can also be dragged in and out of a Stack. The downloads stack will reflect download status.

Stacks has tight integration with the Finder. To open a Stack folder in Finder, a user can:
  • Click and hold on the stack, wait for the pop-up menu to appear, then move up and highlight "Open ..."
  • Right-click a Stacks folder and selecting "Show in Finder", or
  • Hold the command key on the keyboard and click on a Stack to open the Stack's folder in Finder. Doing the same thing on a folder within a stack will open that folder as well.
While viewing a stack, an item will be selected when typing the first letter of its name. Arrow keys on the keyboard can also be used to navigate a stack, but the mouse scroll wheel/button for Stack item selection is not supported yet.


Enhancements
Most Stacks enhancements involve changing Stack icons, some sites are also providing instructions on how to create custom Stack icons. Other enhancements include adding a recent items stack, enabling mouse-over Stack item selection, and clearing working Stacks. Utilities are also enhancing Stacks navigation. Stack-like solutions are appearing on the iPhone and Microsoft Windows.


Summary
Although there is still controversy over whether or not Stacks is useful in its current state, some users are embracing its functionality as a good way to enable application and document favorite categorization.

Sunday, January 27, 2008

Leopard Stacks...no hierarchy needed

The following entry was originally posted on a MacLife forum.

- - - -

One of the things that really gets under my skin is the "Start" button in Windows, having to navigate multiple levels of hierarchy just to start an application. I am not going to use any utility in OS X that attempts to emulate that.

DockFun! was a great Tiger utility, it dynamically changes the OS X Dock based on categories that are setup in advance. I had multiple docks setup on my system with various applications, including a home dock, a work dock, a video project dock, etc. The docks did not necessarily reflect the application hierarchy that was setup in the Applications folder. My goal was to keep every doc as flat as possible, to enable quick application launching.

Unfortunately, DockFun! is not compatible with Leopard Stacks, but I was able to setup similar functionality using Stacks:

1. Create a subfolder in the Applications folder and name it "Stacks".
2. Within the Stacks folder, create a subfolder for every application category required (e.g. "home", "work", "video projects").
3. Copy application aliases (click-and-drag with command-alt) to each of the category folders (those created in step 2).
4. Add custom overlay drawers to the category folders as shown here.
5. Click and drag the category folders onto the dock.

I currently have 13 favorite applications in my dock along with 14 separate stacks/categories that are easily recognizable and quick to navigate.

Is Stacks perfect? No, but it is a great start. For some reason, Stacks in the beta release of Leopard looked different than it did in the final release. I would love to be able to scroll through all Stack items using my mouse scroll button, regardless of how items are in each Stack.